


It's rather hard to believe, unimaginable even, but here we are. This is the 120th consecutive edition of toolsmith; every month for the last ten years, I've been proud to bring you insights and analysis on free and open source security tools. I hope you've enjoyed the journey as much as I have, I've learned a ton and certainly hope you have too. If you want a journey through the past, October 2006 through August 2015 are available on my web site here, in PDF form, and many year's worth have been published here on the blog as well.
I labored a bit on what to write about for this 10th Anniversary Edition and settled on something I have yet to cover, a physical security topic. To that end I opted for a very slick, maker project, using a Raspberry Pi 2, a USB web cam, and motionEyeOS. Per Calin Crisan, the project developer, motionEyeOS is a Linux distribution that turns a single-board computer into a video surveillance system. The OS is based on BuildRoot and uses motion as a backend and motionEye for the frontend.
- Buildroot "is a simple, efficient and easy-to-use tool to generate embedded Linux systems through cross-compilation."
- Motion (wait for it) is a program that monitors the video signal from cameras and is able to detect if a significant part of the picture has changed; in other words, it can detect motion.
- motionEye is also Calin's project and is web frontend for the motion daemon.
Installation was insanely easy, I followed Calin's installation guidelines and used Win32DiskImager to write the image to the SD card. Here's how straightforward it was in summary.
1) Download the latest motionEyeOS image. I used build 20160828 for Raspberry Pi 2.
2) Write the image to SD card, insert the SD into your Pi.
3) Plug a supported web camera in to your Pi, power up the Pi. Give it a couple minutes after first boot per the guidelines: do not disconnect or reboot your board during these first two minutes. The initialization steps:
- prepare the data partition on the SD card
- configure SSH remote access
- auto-configure any detected camera devices
For detailed installation instructions, refer to PiMyLifeUp's Build a Raspberry Pi Security Camera Network. It refers to a dated, differently named (motionPie) version of motionEyeOS, but provides great detail if you need it. There are a number of YouTube videos too, just search motionEyeOS.
Configuration is also ridiculously simple. Point your browser to the IP address for the Pi, http://192.168.248.20 for me on my wired network, and http://192.168.248.64 once I configured motionEyeOS to use my WiFi dongle.
The first time you login, the password is blank so change that first. In the upper left corner of the UI you'll see a round icon with three lines, that's the setting menu. Click it, change your admin and user (viewer) passwords STAT. Then immediately enable Advanced Settings.
 |
| Figure 1: Preferences |
You'll definitely want to add a camera, and keep in mind, you can manage multiple cameras with on motionEyeOS devices, and even multiple motionEyeOS systems with one master controller. Check out Usage Scenarios for more.
 |
| Figure 2: Add a camera |
Once your camera is enabled, you'll see its feed in the UI. Note that there are unique URLs for snapshots, streaming and embedding.
 |
| Figure 3: Active camera and URLs |
There are an absolute plethora of settings options, the most important of which, after camera configuration, is storage. You can write to local storage or a network share, this quickly matters if you choose and always-on scenario versus motion enabled.
 |
| Figure 4: Configure file storage |
 |
| Figure 5: Options, options, options |
There are configuration options that allow you to run commands so you script up a preferred process or use one already devised.
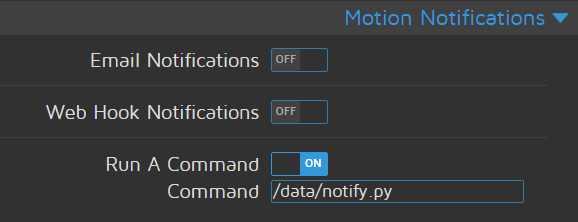 |
| Figure 6: Run a command for notification |
Best of all, you can make uses of a variety of notification services including email, as well as Pushover, and IFTTT via Web Hooks.
 |
| Figure 7: Web Hook notifications |
The net result, after easy installation, and a little bit of configuration is your on motion-enabled CCTV system that costs very little compared to its commercial counterparts.
 |
| Figure 8: Your author entering his office under the watchful eye of Camera1 |
In closing, I love this project. Kudos to Calin Crisan for this project. Makers and absolute beginners alike can easily create a great motion enabled video/still camera setup, or a network of managed cameras with always on video. The hardware is inexpensive and readily available. If you've not explored Raspberry Pi this is a great way to get started. If you're looking for a totally viable security video monitoring implementation, motionEyeOS and your favorite IoT hardware (the project supports other boards too) are a perfect combo. Remember too that there are Raspberry Pi board-specific camera modules available.
Ping me via email or Twitter if you have questions (russ
at holisticinfosec dot org or @holisticinfosec).
Cheers…until next time.


